

The 10 Most Terrifying Things About Fascia Installation
Fascia Installation: A Comprehensive Guide
Fascia boards are a necessary part of any roof, serving both practical and visual roles. Their installation can considerably affect the durability of a building’s roofing system, affecting whatever from insulation to water drainage. This article aims to supply a detailed introduction of fascia installation, providing insights and practical steps for homeowners and professionals alike.
What is Fascia?
Fascia is a long, straight board that runs along the lower edge of the roof. Usually made of wood, vinyl, or aluminum, it functions as a protective barrier for the edges of the roofing and assists support the bottom row of tiles or shingles. In addition to acting as an appealing transition in between the roofing system and the siding of a building, fascia also offers a surface to which gutters can be mounted.
Common Materials Used for Fascia
ProductProsConsWoodNatural look; personalized; easy to paintProne to rot and bug damage; needs continuous maintenanceVinylResilient; low maintenance; offered in numerous colorsCan become brittle with time; minimal personalizationAluminumLong-lasting; resistant to rust; light-weightCan dent easily; may need specific tools for cutting
Significance of Proper Fascia Installation
Appropriate fascia installation is important for a number of factors:
- Structural Integrity: Fascia assists to support the roofing and the weight of any seamless gutters, making sure that both carry out efficiently.
- Aesthetic Appeal: A well-installed Fascia And Soffit Maintenance board can boost the general look of a structure.
- Defense from Elements: It provides a barrier against rain, snow, and wind, protecting the underlying structures.
- Avoidance of Pest Infestation: A protected fascia can help avoid insects like birds and squirrels from getting in the roofing cavity.
Steps for Installing Fascia
Fascia installation can be broken down into a series of organized steps. Each action is crucial to guarantee that the fascia is set up correctly and will last for several years to come.
Preparation
Before starting the installation, gather all essential materials and tools. Here is a checklist of products you may require:
- Fascia boards (wood, vinyl, or aluminum)
- Measuring tape
- Miter saw or circular saw
- Level
- Caulk and caulking weapon
- Galvanized nails or screws
- Ladder
- Security equipment (gloves, safety glasses)
Measuring and Cutting
- Measure the Area: Use a measuring tape to identify the length of the fascia board needed. Make certain to take accurate measurements, accounting for any angles or slopes in the roofing.Location TypeMeasurement TechniqueStraight EdgeProcedure from end to endAngled RoofsMeasure length and angle independently
- Cut the Fascia Board: Use a miter saw or circular saw to cut the fascia board to the appropriate lengths. If corners need to be cut, use a miter joint for a tidy surface.
Setting up the Fascia
- Position the Fascia Board: Place the Fascia And Soffit Installation board along the edge of the rafters, guaranteeing it is level and fits comfortably against the Roofline Replacement.
- Secure the Board: Using galvanized nails or screws, protect the fascia board into place. Space the fasteners around every 16 inches to ensure stability.
- Seal Joints and Edges: Apply caulk to any joints or spaces to avoid wetness ingress. This action is particularly crucial for wooden fascia to prolong its lifespan.
Final Touches
- Paint or Finish: If utilizing wood, think about staining or painting the fascia board for visual appeal and included defense versus the components.
- Set up Gutters: If you prepare to have rain gutters, install them after the fascia is secured to make sure correct drain.
- Clean-up: Remove any debris and guarantee that the area around the installation is tidy and clear.
Maintenance Tips for Fascia
Like any part of a home’s outside, fascia boards need regular maintenance to stay practical and appealing. Here are some Best Fascia Replacement practices:
- Inspect Regularly: Check for indications of wear, rot, or damage a minimum of twice a year.
- Keep Paint or Stain: For wood fascias, regularly touch up paint or stain as required.
- Clear Debris: Keep the area around the fascia free from leaves and debris to avoid pest entry and Fascia Board Repair] water pooling.
- Repair Damage Quickly: Address any concerns as quickly as they are discovered to prevent more degeneration.
Frequently Asked Questions About Fascia Installation
Q1: Can I install fascia myself?
A1: Yes, if you have standard woodworking abilities and the essential tools, you can install fascia yourself. However, if you are not confident, it might be best to hire a professional.
Q2: How long does fascia last?
A2: The lifespan of fascia varies by material. Wood fascias can last 10-20 years with appropriate maintenance, while vinyl and aluminum can last significantly longer if well taken care of.
Q3: What are the signs of fascia damage?
A3: Look for signs such as peeling paint, fractures, rot, or spaces in between the fascia and the roofing. These can indicate underlying concerns that need to be dealt with.
Q4: Do I need to remove my old fascia before installing new fascia?
A4: In many cases, it is suggested to eliminate the old fascia to examine for any covert damage and to ensure correct installation of the brand-new fascia.Fascia installation, while uncomplicated, is a crucial component of keeping the health of a home. Understanding the products involved, following correct installation methods, and keeping the fascia in time can lead to a resilient and visually enticing result. By sticking to best practices and regularly checking for issues, property owners can protect their financial investments and enhance their home’s curb appeal.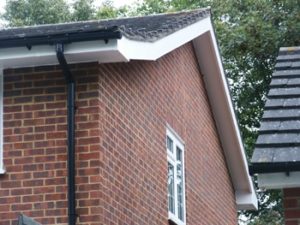
请登录或注册以提交给你的回答


